LocostUSA.com
http://locostusa.com/forums/

Help!!! I cannot do compound angles
http://locostusa.com/forums/viewtopic.php?f=15&t=1326
Page 1 of 3

Author:  randidly [ November 3, 2006, 9:55 pm ]
Post subject:  Help!!! I cannot do compound angles

I have been in the garage for 3 hours have made lots of cuts but cannot seem to get the measurement right I nee a step by step on how to measure and cut the LA and LB tubes. I cannot for some reason seem to get it right. I need an easy to understand explanation. not really math and theory just how to do it correctly.

Thanks

Author:  GatoEnFuego [ November 4, 2006, 12:40 am ]
Post subject: 

cut one angle, turn tube on side measure other angle from the straight edge of the first cut... i don't know any other way to explain it. well you could get a compound miter saw and make life easier.

Author:  thekafer [ November 4, 2006, 12:47 pm ]
Post subject: 

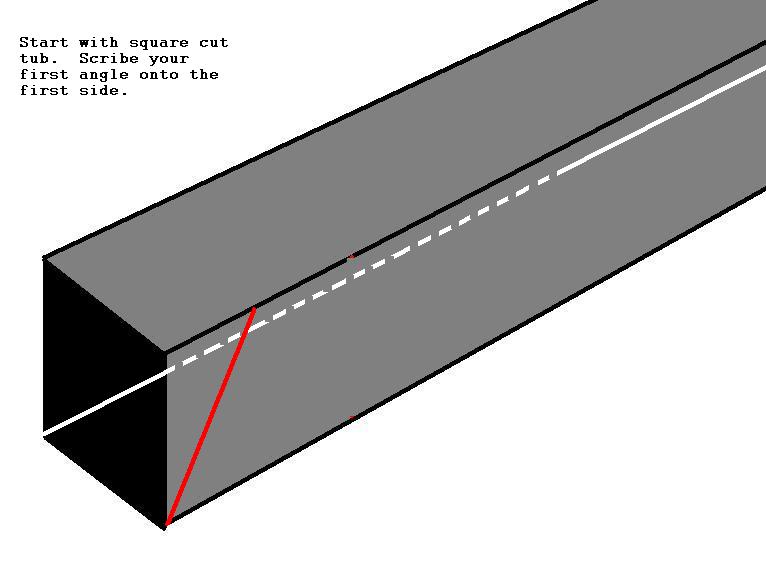
Most people reach for the compound miter saw first but I found that marking the tube (with magic marker and a scribe) accurately, cutting close with a hack saw, and then using a 8" or larger disc sander to grind to the lines was not only faster but allowed me to creep up on the angle and test fit! I ended up with very tight weld joints :) I had a table used for aircraft fuselage fixturing so I know my frame was very straight and i still needed to "coax" them in to get frame dimensions right. It also is quick for putting the all important bevel on each tube for welding! :wink:

P.S. The trueness of your table is critical or you wont be able to go by the prints angle call-outs to begin with! :? Good luck!

Fletch.

Author:  KB58 [ November 4, 2006, 1:09 pm ]
Post subject: 

That's one reason I don't think designing a Locost (or any tube-frame) car in CAD will work. There's just too much variation in each joint, movement due to welding distortion, and human error to assume it'll all fit perfectly. You always have to be on guard for goofs, not matter how accurate the metal's cut.

Author:  randidly [ November 4, 2006, 2:13 pm ]
Post subject: 

it is not so much cutting the angles. I have a All kinds of saws it is getting the correct angles and lenghts. I am not doing something right with the setting up of the angles to cut. Can someone start with the LA tube and tell me what lenght to cut it and starting on 1 side tell me how to mark the tube and then how to do the other end my mind for some reason cannot seem to get it right. I think once I get it visualized in my head I will be able to do it.

And believe it or not I don't "usually" ride the short Yellow Bus:)

Thanks for the help

Randy

Author:  mr.peabody.d [ November 4, 2006, 3:00 pm ]
Post subject: 

Those cuts were REALLY tough for me too......

It helps if you meassure out and build a gig.....like this.
Image
(fom Chets build log about three pages deep)
Then just slowly take your time and cut them to fit (make them to fit)

Failing that you could buy that peice for about 45 dollars from one of the linked distributors on the home page

Err it used to be northamericanlocost.com but the site is missing gone (did they go under?)

Author:  chetcpo [ November 4, 2006, 4:17 pm ]
Post subject: 

I don't know if this will help but I just spent 10 minutes trying to draw something in Paint to help illustrate how I did it.

Image
Image
Image
Image

It's tough to explain, hopefully these will help you visualize it. I just marked the tubes and then cut each angle seperately with a hacksaw and a vice.

Author:  randidly [ November 4, 2006, 4:32 pm ]
Post subject: 

now thats what I needed I will try tomorrow

Thanks

Randy

That should be sticky'ed

Author:  zetec7 [ November 5, 2006, 4:35 am ]
Post subject: 

I cheated doing this, and it worked beautifully. I set the horizontal angle up for the cut , using my cheap horizontal band saw. Then I lifted the far end of the tube up (so it wasn't sitting flat on the bed of the band saw) using a piece of steel to prop it up to the correct angle. I first scribed the vertical displacement angle onto the steel with a scriber, and just lifted the tubing up until the scribe line was exactly at right angles to the saw bed, jammed a piece of steel tubing under it to keep it at this angle. Clamped the tube in place, made the cut. Perfect, first time!

Repeated this procedure for all the needed cuts, and didn't even need to massage any of the cuts with a grinder. Everything lined up better than I had hoped, with no need to grind, or fill with MIG. It may not be elegant, but it's results that matter...

:D :D :D

Author:  JackMcCornack [ November 5, 2006, 12:23 pm ]
Post subject: 

What zetec7 said. Plus, if you're using a cutoff saw, you can make a block that's the correct angle for one line (to hold the tube tilted vertically a la zetec7) and set the other angle with the miter function, or you can find cheap compound miter saws for wood, and they'll last a fair while using abrasive blades on steel. Only caveat is, if they have plastic angle graduations, they'll melt from the sparkstorm, and you won't be able to read them.

On the control arms; are you going with Book bushings, or rod ends? 'Cause if it's rod ends you'll want different angles than in the book.

Author:  Locost_Johnh [ November 6, 2006, 5:16 pm ]
Post subject: 

I made a tiered block setup as shown in one of the above posts, clamped the horizontal tubes on them, cut the vertical tubes close using the "block under one end while clamped at an angle in my chop saw" that Jack mentioned, then did a lot of grinding, fitting, grinding, fitting, etc. Took a while, but it worked for me.

One thing to be careful of, is that the outer edge of the vertical tubes needs to be at the correct angle if you want your suspension brackets to be at the correct angle without shimming. I didn't get mine quite right and had to shim the brackets before welding them. Seems to me if you use a tiered block setup, the outer edges should be perfectly vertical - 90 degrees to the table using a vertical square.

John

Author:  Ivan7 [ November 12, 2006, 3:21 am ]
Post subject: 

Hi - Sorry to have come to this thread so late but have a look at my build diary no2 for a simple jig that worked really well for me.

If you aren't certain what length to cut the LA and LB just make them say 6mm longer then cut off to the right length with an angle grinder and thin blade once you have offered them up. The existing cut gives an easy guide to the new cut.

Also note my comment about only tack welding in until you have finalised your wishbones.

http://www.Locostsa.co.za/BuildDiaries/ ... ary_02.htm

Author:  whittlebeast [ November 12, 2006, 9:18 am ]
Post subject: 

The short answer is start long mark with a black magic marker and sand to fit. Below is the long answer of how I realy do this.

I like to start by getting a 4ft by 9ft tall x 1.75" sollid core commerical door They are very strong easy to drill thru or screw to no make temperary fixturing. Next I lay out the entire chassis on the table/door in 1" wide tape. Now all you have to do is work your way around the table cutting/grinding each tube to fit within about 1/32" Tacking and clamping blocking each one as you go around. Any pair of tubes that will be later intersected by a cross tube needs to be welded in the corner at this point as once the cross tube is welded is, you wont be able to weld the inside of the intersection. THe other trick is always drill vent holes for every tube that will be eventually be closed at both ends. This will avoid building pressure in the tube later if you have to weld on the tube that will build pressure during welding and blow pressurized metal back in your face.

Image

Author:  Auto-X Fil [ August 31, 2007, 6:20 pm ]
Post subject: 

zetec7 wrote:
I cheated doing this, and it worked beautifully. I set the horizontal angle up for the cut , using my cheap horizontal band saw. Then I lifted the far end of the tube up (so it wasn't sitting flat on the bed of the band saw) using a piece of steel to prop it up to the correct angle. I first scribed the vertical displacement angle onto the steel with a scriber, and just lifted the tubing up until the scribe line was exactly at right angles to the saw bed, jammed a piece of steel tubing under it to keep it at this angle. Clamped the tube in place, made the cut. Perfect, first time!

Repeated this procedure for all the needed cuts, and didn't even need to massage any of the cuts with a grinder. Everything lined up better than I had hoped, with no need to grind, or fill with MIG. It may not be elegant, but it's results that matter...

:D :D :D


This worked well for me. The angles are within 1ยบ and the lengths are essentially identical and within 0.1". I actually never made a scribe mark at all - I just measured to the blade on the bandsaw.

Author:  Ivan7 [ September 1, 2007, 4:06 am ]
Post subject: 

Hi - the jig in my build diary worked well for me:-

http://www.Locostsa.co.za/BuildDiaries/ ... ary_02.htm

Page 1 of 3 All times are UTC - 5 hours [ DST ]
Powered by phpBB® Forum Software © phpBB Group
https://www.phpbb.com/