LocostUSA.com

Learning how to build Lotus Seven replicas...together!
It is currently April 17, 2024, 8:04 pm

All times are UTC - 5 hours [ DST ]


Post new topic Reply to topic  [ 224 posts ]  Go to page Previous  1 ... 9, 10, 11, 12, 13, 14, 15  Next
Author Message
PostPosted: March 15, 2013, 3:34 pm 
Offline
User avatar

Joined: April 6, 2011, 5:48 pm
Posts: 29
Location: Frozen Tundra
Some of us have the gurney flap pointed backwards, towards the rear. It doesn't affect the aero and adds stiffness to the spoiler. One of the recent Fastracks had a note out for member comment regarding spoiler strakes but that wouldn't make them legal til next year. For now wire or support rods will have to do.


Top
 Profile  
Reply with quote  
PostPosted: March 18, 2013, 12:44 am 
Offline

Joined: September 30, 2011, 4:08 pm
Posts: 245
Location: Portland, OR
cashmo wrote:
Some of us have the gurney flap pointed backwards, towards the rear. It doesn't affect the aero and adds stiffness to the spoiler. One of the recent Fastracks had a note out for member comment regarding spoiler strakes but that wouldn't make them legal til next year. For now wire or support rods will have to do.


flipping it around it is!

I finished cutting all of the foam up and got it glued together

Image

and then I started carving out the foam. I think it's getting closer to looking right. then much bondo will be had and more sanding

I'm thoroughly entrenched in a pink snowstorm at the shop

Image

Image

_________________
My Build thread: F20C powered Autox & track toy

Buy my car! - F20C Race car


Top
 Profile  
Reply with quote  
PostPosted: March 18, 2013, 8:10 am 
Offline
We are Slotus!
User avatar

Joined: October 6, 2009, 9:29 am
Posts: 7651
Location: Tallahassee, FL (The Center of the Known Universe)
Quote:
then much bondo will be had and more sanding


yo, Tongboy!
Stop me if you've heard this one... You know that actual "Bondo" body filler or glazing putty will melt that foam, don't you? I have the habit of calling ALL body filler "Bondo" even if it's not, and perhaps you do as well. If so, don't bother reading the rest of this! :mrgreen:

What I discovered (late in the process) is that the best filler for this kind of work is to use the same resin/hardener that you'll use on your 'glass but to add some of the "filler" material that makes it thicker and (Key thing!) more sandable. I used West epoxy and for filler work I added some of their "Microlight Fairing Filler". It's like flour, very fine, light powder, just off-white and it STINKS! But, mixed with epoxy until it's about like peanut butter, it makes a good sandable surface for filling cracks and holes and such.
:cheers:
JDK

_________________
JD, father of Quinn, Son of a... Build Log
Quinn the Slotus:Ford 302 Powered, Mallock-Inspired, Tube Frame, Hillclimb Special
"Gonzo and friends: Last night must have been quite a night. Camelot moments, mechanical marvels, Rustoleum launches, flying squirrels, fru-fru tea cuppers, V8 envy, Ensure catch cans -- and it wasn't even a full moon." -- SeattleTom


Top
 Profile  
Reply with quote  
PostPosted: March 18, 2013, 7:32 pm 
Offline
User avatar

Joined: December 7, 2012, 8:28 am
Posts: 1410
Location: Sarasota
Tongboy wrote:
cashmo wrote:

Image

It looks great but it does not look symmetrical to me. The center section need the right side to be cut down a little bit to make the nice gravestone shape even and the nect just above it is tighter on the left than on the right.

You probably know this but I thought I would point it out now because one you start glassing it will be very hard to make any changes. Great job by the way I am very jealous of your car!

_________________
2015 & 2016 EMod Florida State Autocross Champion
2013 & 2014 DSP Florida State Autocross Champion

Scrap Metal Build Log viewtopic.php?f=35&t=14558


Top
 Profile  
Reply with quote  
PostPosted: March 18, 2013, 10:55 pm 
Offline

Joined: September 30, 2011, 4:08 pm
Posts: 245
Location: Portland, OR
GonzoRacer wrote:
Quote:
then much bondo will be had and more sanding


yo, Tongboy!
Stop me if you've heard this one... You know that actual "Bondo" body filler or glazing putty will melt that foam, don't you? I have the habit of calling ALL body filler "Bondo" even if it's not, and perhaps you do as well. If so, don't bother reading the rest of this! :mrgreen:

What I discovered (late in the process) is that the best filler for this kind of work is to use the same resin/hardener that you'll use on your 'glass but to add some of the "filler" material that makes it thicker and (Key thing!) more sandable. I used West epoxy and for filler work I added some of their "Microlight Fairing Filler". It's like flour, very fine, light powder, just off-white and it STINKS! But, mixed with epoxy until it's about like peanut butter, it makes a good sandable surface for filling cracks and holes and such.
:cheers:
JDK


Interesting... the bondo that you can actually see in the picture hasn't negatively affected the foam so far. I put some more on today after checking everything already there and it seems fine... pound for pound, or should I say volume? bondo seems a fair amount cheaper than resin but if it's easier to work with the resin I'd happily switch.

wrightcomputing wrote:
It looks great but it does not look symmetrical to me. The center section need the right side to be cut down a little bit to make the nice gravestone shape even and the nect just above it is tighter on the left than on the right.

You probably know this but I thought I would point it out now because one you start glassing it will be very hard to make any changes. Great job by the way I am very jealous of your car!


You're totally right. I wanted to start with getting ot roughly the correct shape and now that i'm pretty happy with it (I actually changed it a bit today) it's time to get back to working on making sure everything is symmetrical... something that isn't super easy with something this size. It doesn't help that this is the first time i've done this.

You're making great progress on your car, no reason to be jealous, you'll be done in no time.

_________________
My Build thread: F20C powered Autox & track toy

Buy my car! - F20C Race car


Top
 Profile  
Reply with quote  
PostPosted: March 18, 2013, 11:30 pm 
Offline
We are Slotus!
User avatar

Joined: October 6, 2009, 9:29 am
Posts: 7651
Location: Tallahassee, FL (The Center of the Known Universe)
Quote:
the bondo that you can actually see in the picture hasn't negatively affected the foam so far

Now you've got my interest piqued. I had seen the "brown stuff" on your "pink stuff" in the picture but had assumed it was glue. I know I melted some foam when I was building bodywork. I'm almost certain it was with "Bondo". And then another time later, with two-part epoxy. (not the resin, just off-the-shelf epoxy glue) But as I do tend to call any filler by that name, perhaps it wasn't actually "Bondo" filler. Or, perhaps your "pink foam" material is different from the material I was using. There's one type of foam, the name of which I can't recall properly, that doesn't melt with poly resin or bondo. Google comes up with "polyisocyanurate"... Perhaps that's it...

Obviously the "bondo" you are using does not melt the "pink stuff" you are using, so go right on with it, Sir!

:cheers:
JDK

_________________
JD, father of Quinn, Son of a... Build Log
Quinn the Slotus:Ford 302 Powered, Mallock-Inspired, Tube Frame, Hillclimb Special
"Gonzo and friends: Last night must have been quite a night. Camelot moments, mechanical marvels, Rustoleum launches, flying squirrels, fru-fru tea cuppers, V8 envy, Ensure catch cans -- and it wasn't even a full moon." -- SeattleTom


Top
 Profile  
Reply with quote  
PostPosted: March 19, 2013, 12:01 am 
Offline
User avatar

Joined: April 6, 2011, 5:48 pm
Posts: 29
Location: Frozen Tundra
Looks great so far. Have you decided what you'll do on the rear of the tire/fender? The Solo rules writers wrote in some detail about the front of the fender/splitter but didn't give us any clues on what was legal to do on the back side aero wise. Or have you decided the 7 will become a Morgan? :wink:

Jeff


Top
 Profile  
Reply with quote  
PostPosted: March 19, 2013, 3:17 pm 
Offline

Joined: September 30, 2011, 4:08 pm
Posts: 245
Location: Portland, OR
GonzoRacer wrote:
Quote:
the bondo that you can actually see in the picture hasn't negatively affected the foam so far

Now you've got my interest piqued. I had seen the "brown stuff" on your "pink stuff" in the picture but had assumed it was glue. I know I melted some foam when I was building bodywork. I'm almost certain it was with "Bondo". And then another time later, with two-part epoxy. (not the resin, just off-the-shelf epoxy glue) But as I do tend to call any filler by that name, perhaps it wasn't actually "Bondo" filler. Or, perhaps your "pink foam" material is different from the material I was using. There's one type of foam, the name of which I can't recall properly, that doesn't melt with poly resin or bondo. Google comes up with "polyisocyanurate"... Perhaps that's it...

Obviously the "bondo" you are using does not melt the "pink stuff" you are using, so go right on with it, Sir!

:cheers:
JDK


haha, I checked through your build thread - you're using the same pink stuff I am - it's that dow corning stuff - identical to what i'm using. and I'm using actual, real, bondo for whatever that's worth. I know 3m bought bondo a number of years back... maybe they changed the formula?

cashmo wrote:
Looks great so far. Have you decided what you'll do on the rear of the tire/fender? The Solo rules writers wrote in some detail about the front of the fender/splitter but didn't give us any clues on what was legal to do on the back side aero wise. Or have you decided the 7 will become a Morgan? :wink:

Jeff


It's safe to say you're looking at a first of many pieces of composite that will, I hope, be recognizable as a morgan 4+4. I'll need to run the side fenders back to the rear fenders to complete the transformation. the reason for the 4+4 is that the back is much more upright (like my car) than the other morgan's that have more of a sweeping back that I don't really want to cut off my back and change. The only difference when I'm done will be the lack of the very rear sweeping rear fenders - which I could easily add if anyone had a problem with the body looking too dissimilar from the 4+4

_________________
My Build thread: F20C powered Autox & track toy

Buy my car! - F20C Race car


Top
 Profile  
Reply with quote  
PostPosted: March 19, 2013, 4:12 pm 
Offline
User avatar

Joined: July 17, 2008, 9:11 am
Posts: 6415
Location: West Chicago,IL
Bondo is polyester resin. It contains a liquid polystyrene just like the resin. However, due to the fillers in bondo, there is ~75% less styrene available to attack the pink foam. Yes the Bondo does attack the foam, just not as much. If you want to use the pink foam AND protect against the bondo dissolving the foam, I'd suggest trying a sample of the foam first coated with a couple of coats of Zinsser shellac based primer. The shellac part, forms a strong barrier against the resin and bondo plus should provide a good grip for the bondo to adhere. For a final finish, before making the mold, I used straight shellac and then floor wax. You can substitue the PVA release agent for the wax if you prefer.

Test first. This worked for me. YMMV.

_________________
Chuck.

“Any suspension will work if you don’t let it.” - Colin Chapman

Visit my ongoing MGB Rustoration log: over HERE

Or my Wankel powered Locost log : over HERE

And don't forget my Cushman Truckster resto Locostusa.com/forums/viewtopic.php?f=36&t=17766


Top
 Profile  
Reply with quote  
PostPosted: March 31, 2013, 10:26 pm 
Offline
User avatar

Joined: November 22, 2012, 3:19 pm
Posts: 122
Location: Far S.E.Arizona
t is such a long drive for me to get the proper resin resistant foam I just use styrofoam from the local home supply and when I get the shape that I want I cover it all with 2" masking tape and put a couple of layers of polyurethane on it to seal it and lay the wax and mold release on it.
It takes some time but I just get weary of that 200 plus mile round trip to Tucson and the $40 to $45 gas bill in my truck. I always use male molds because if I made proper female molds I would have to build a blimp hanger to store them all in.
Howard


Top
 Profile  
Reply with quote  
PostPosted: March 31, 2013, 11:04 pm 
Offline

Joined: October 19, 2009, 9:36 pm
Posts: 2199
Location: meadview arizona
Howard, i know your pain, i have the same issues with anything i need.

as far as moulds, i use polystyrene foam from the hardware store with a skim of jointing compound and cover it with aluminum foil and aluminum ducting tape to make plug molds.

p.s. what goes through your mind when the chute doesn't come out at almost 300 mph?

_________________
this story shall the good man teach his son,
and chrispin chrispian shall ne'er go by,
from this day to the end of the world.
but we in it shall be remembered.


Top
 Profile  
Reply with quote  
PostPosted: April 23, 2013, 1:25 am 
Offline

Joined: September 30, 2011, 4:08 pm
Posts: 245
Location: Portland, OR
Time for another giant update.

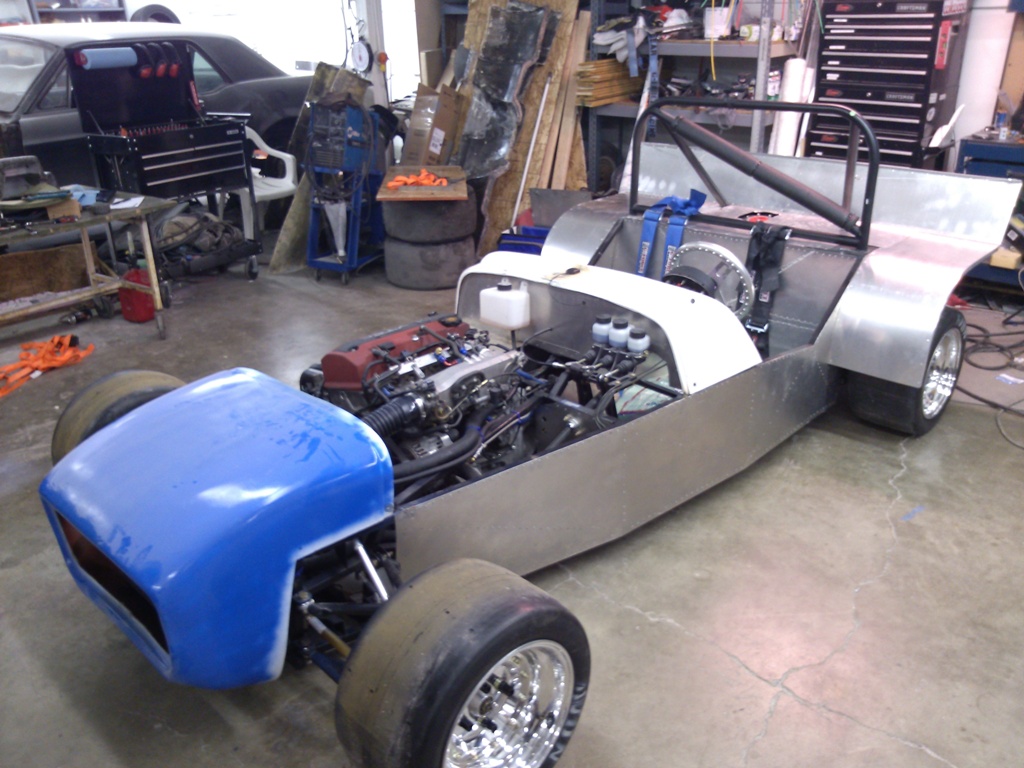
Been busy working on the nose and getting the car sorted out for the next event which was yesterday

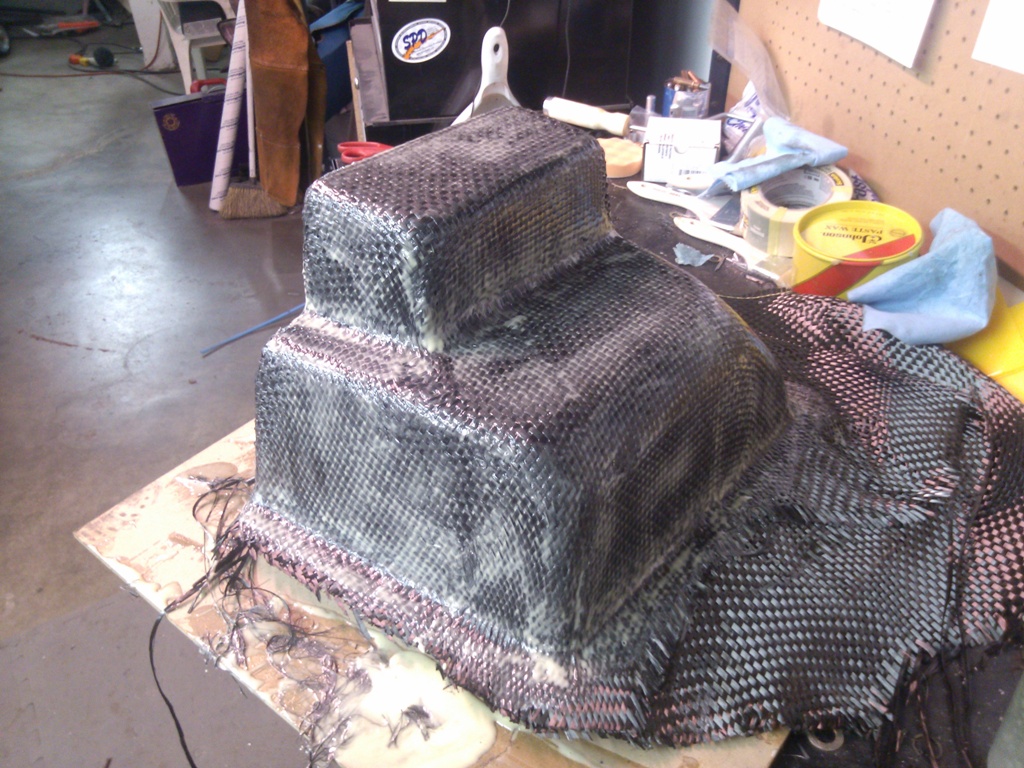
I made my first carbon piece to test out the material and the process. I molded a pedal cover to go over the master cylinders to be thee last part of the firewall
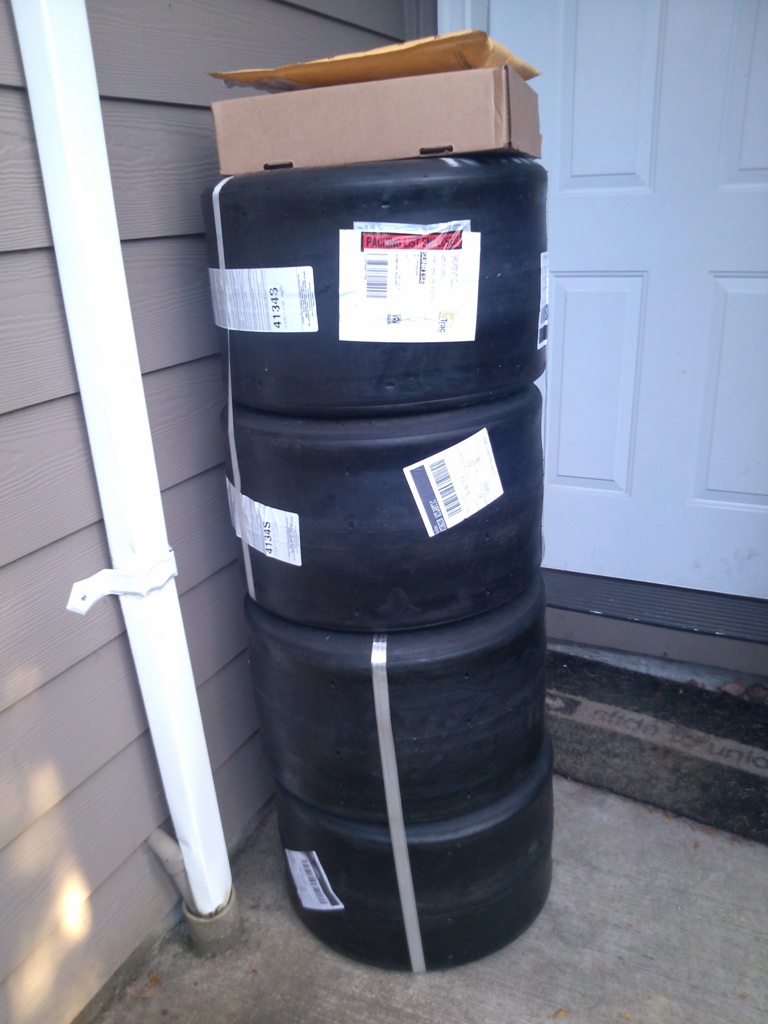
Image

My tires showed up

Image

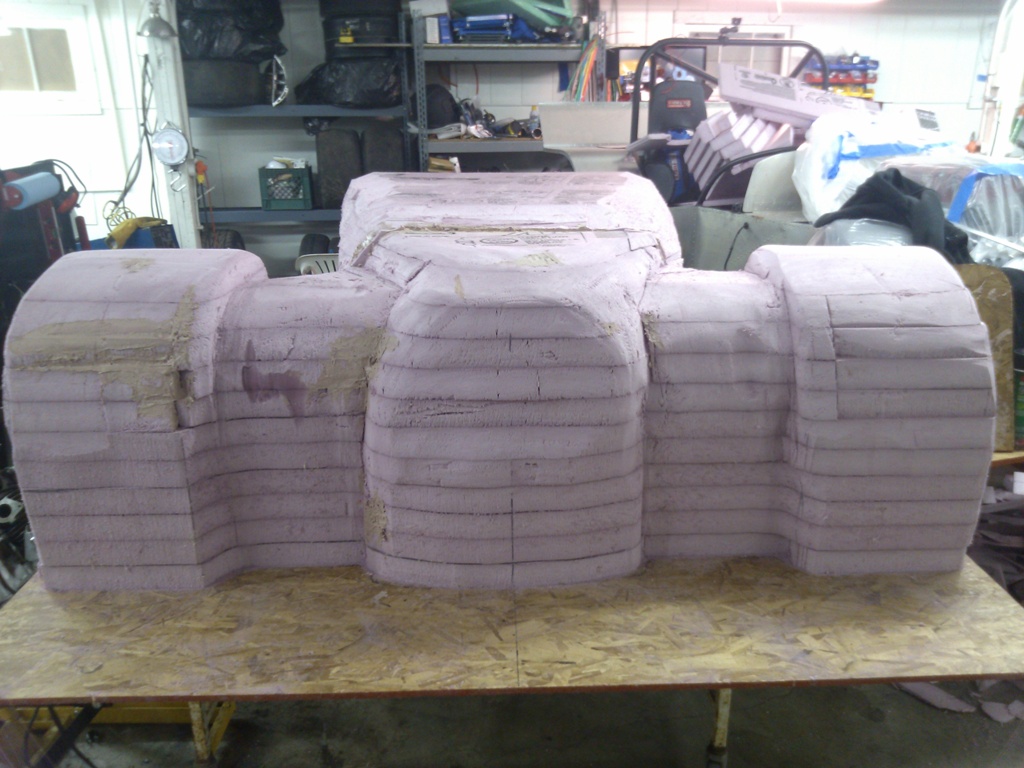
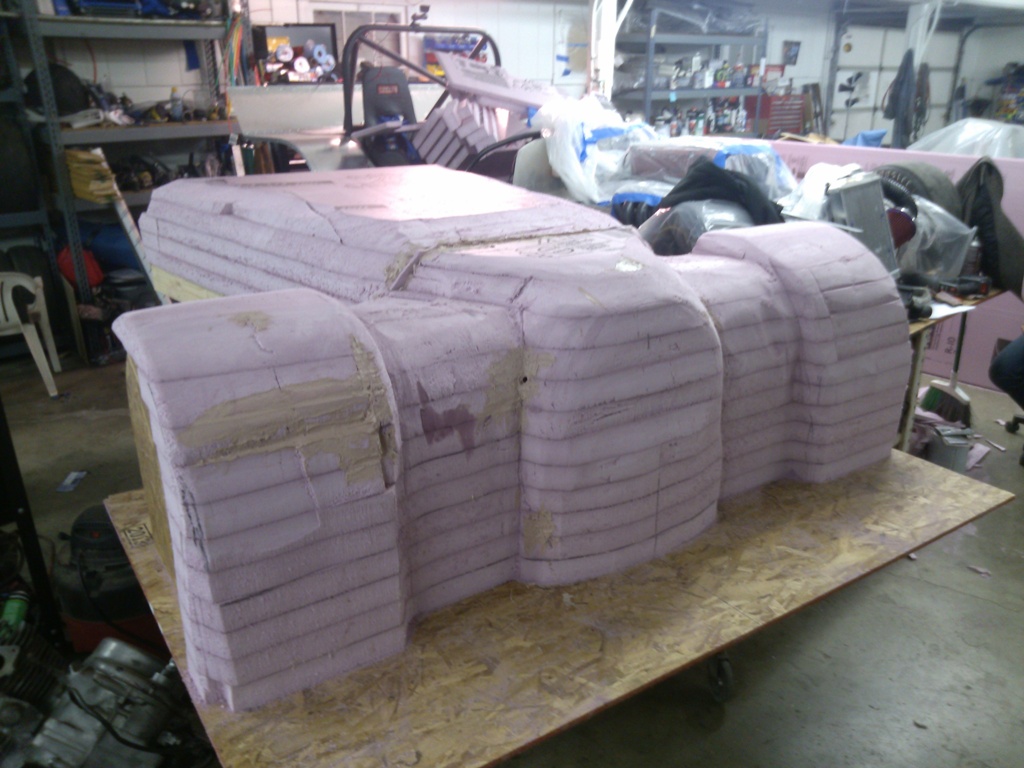
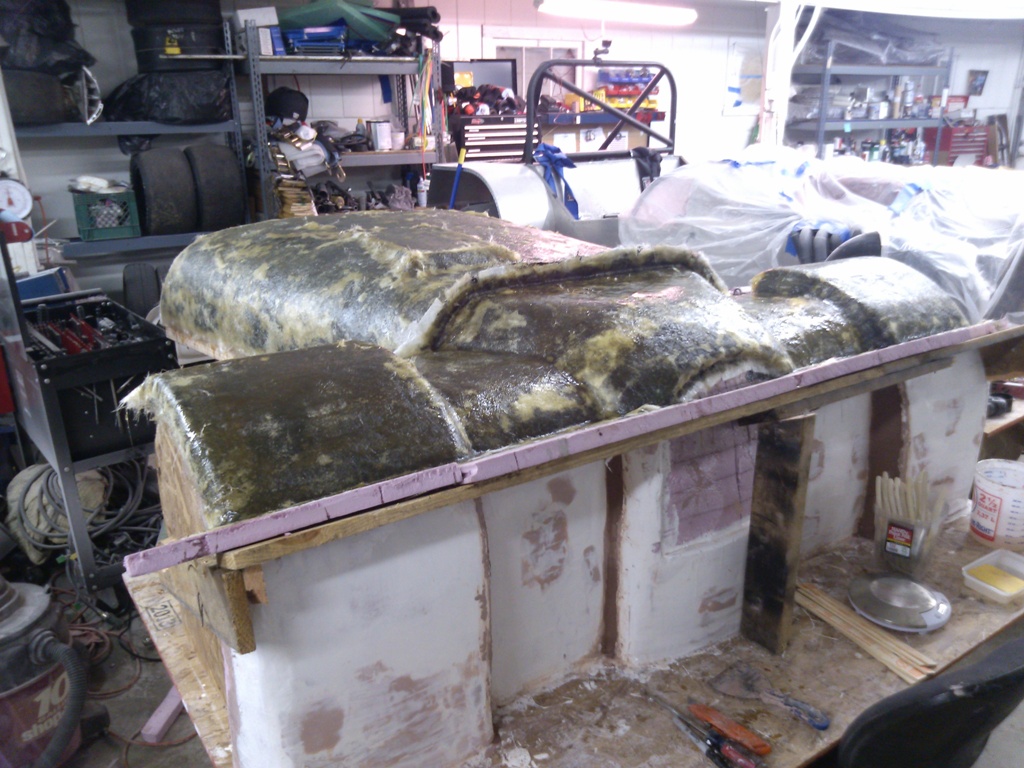
the front nose came along nicely. I used latex as a cover coat to work on levelling and getting everything properly in line.
Image

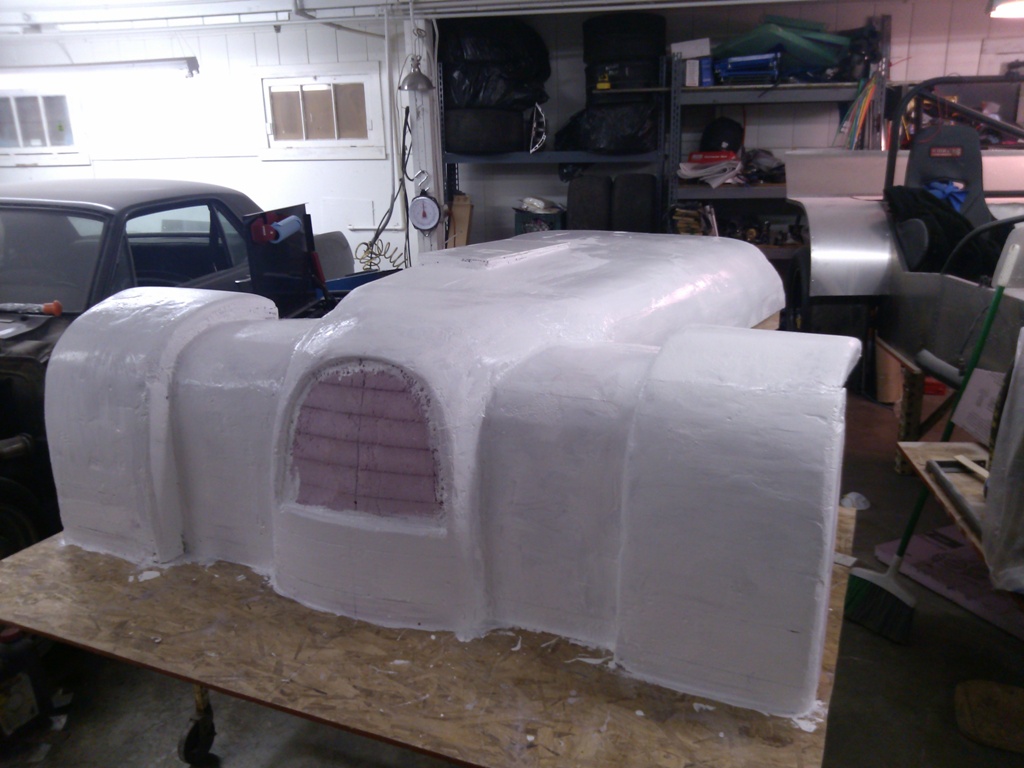
it would then get sanding and lots of bondo to continue the finishing
Image
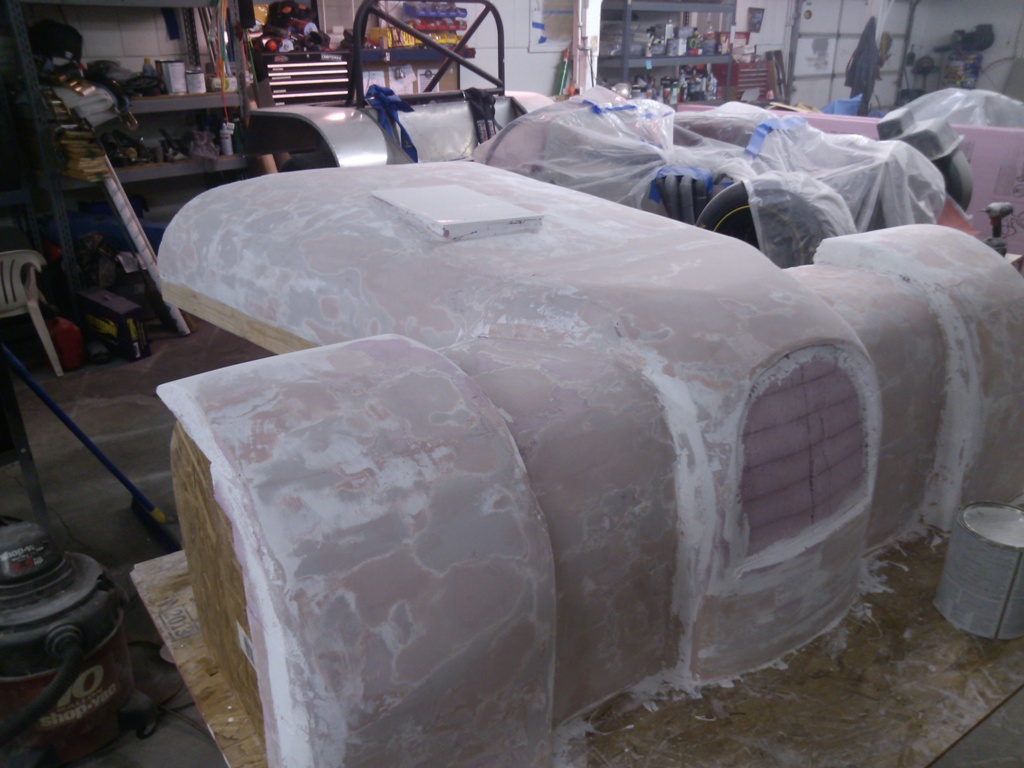
rinse and repeat sanding and dust for forever

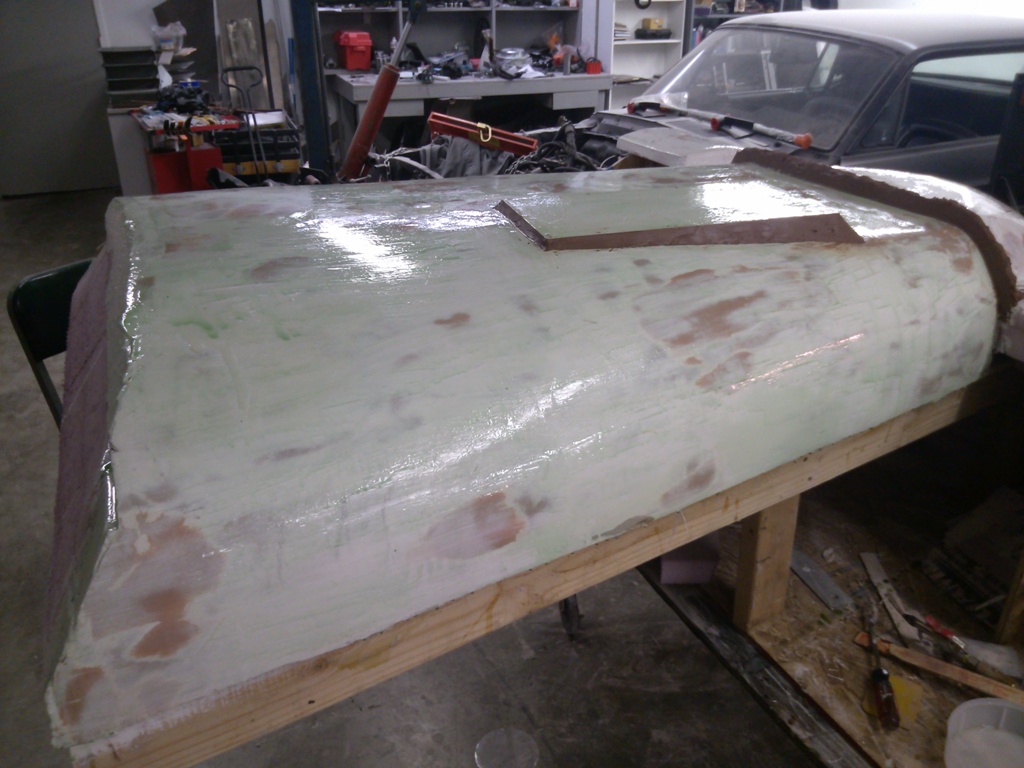
the final layer was a two part sealer. it did a great job at filling a few low spots and gave it a nice shiney candy coating

then came the floor wax and PVA
Image

then the gel coat
Image

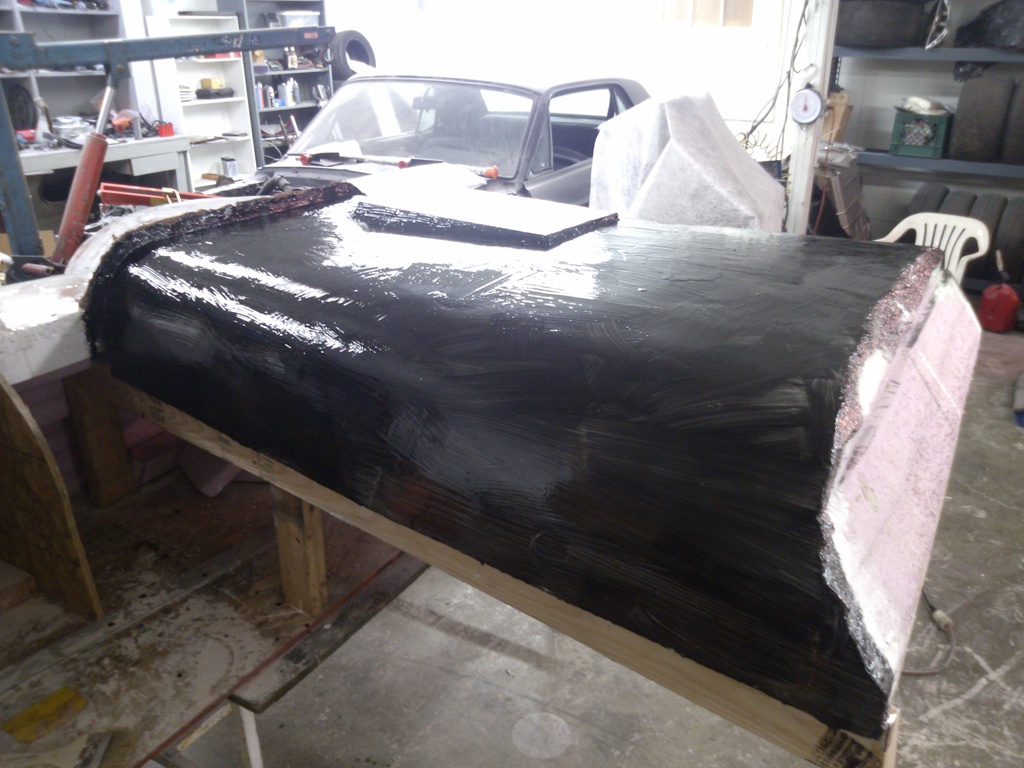
and then came the fiberglass
Image

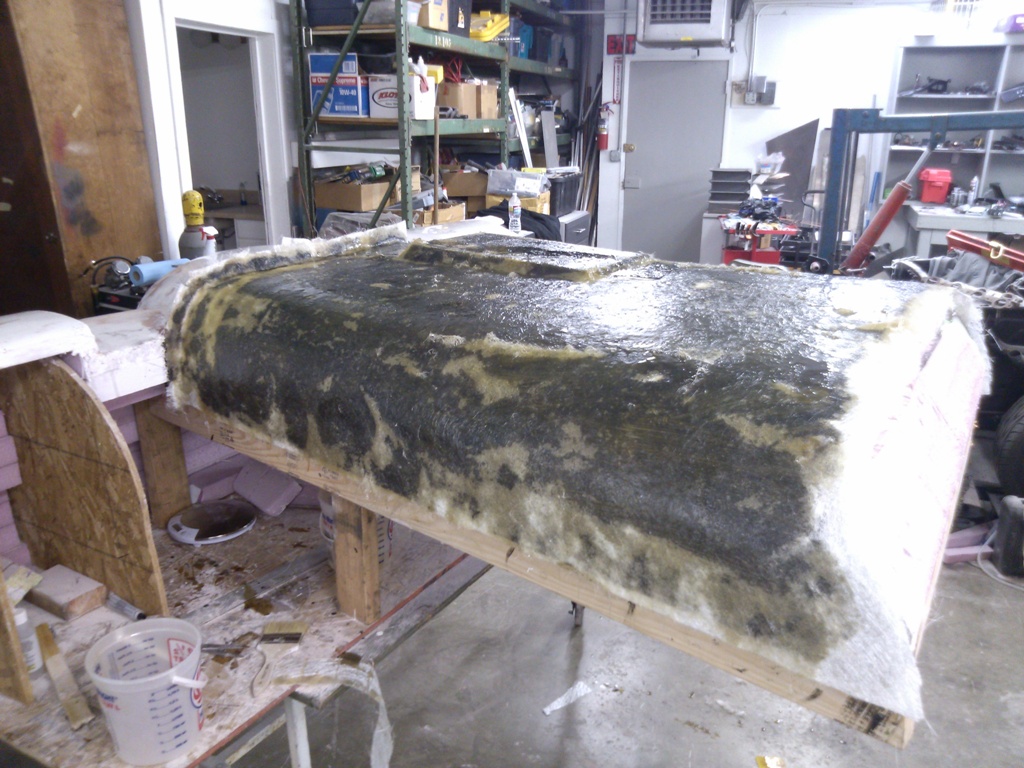
and the second piece
Image

and the third and final piece
Image

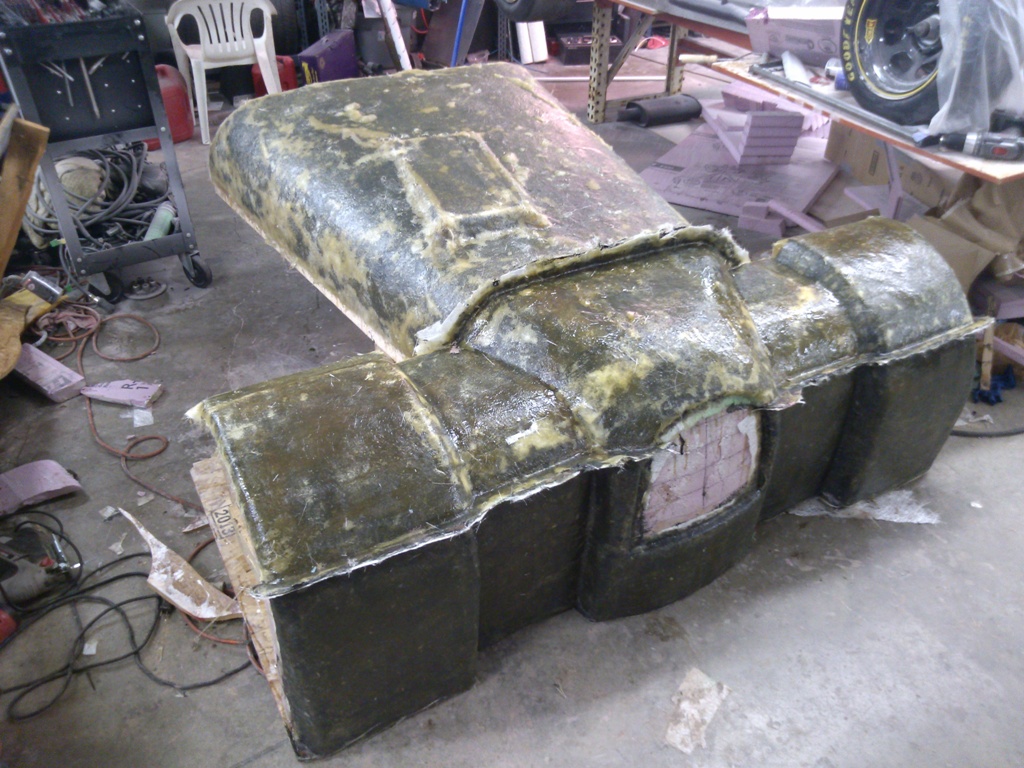
I haven't snapped any shots of the mold off the bucks but it came out pretty well. I'm at that point now where I need to fill in some spots on the mold pieces before I lay the final part into it

my wheels showed up and I got the tires mounted
Image

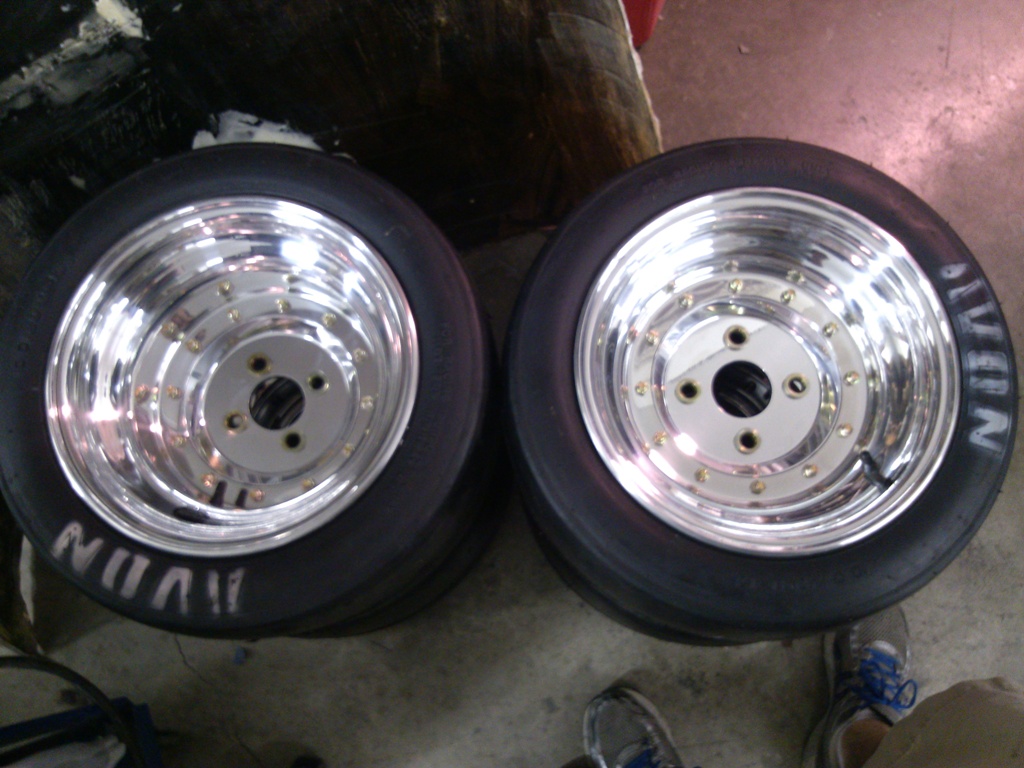
11.45lbs a piece - not bad for a very affordable 13x10

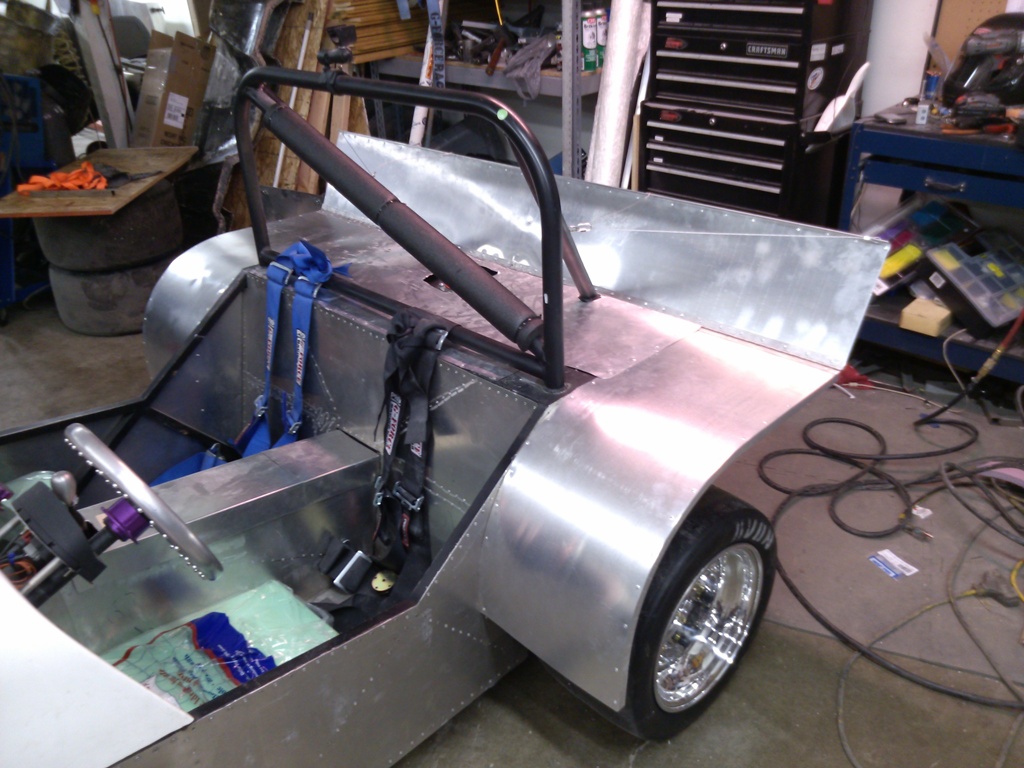
finished up the rear deck spoiler. still need to flip the L bar on the top and make some side pieces
Image

I was making up parts to lengthen the steering rack to delete the bump steer... while doing so I played with really large height changes on the tie rods to the rack and was able to go from a huge amount of bump steer (insane toe out, like 1/2" total toe out at full bump) to 4 thousandths on one side and 5 thousandths on the other side. a small enough amount of deflection that I couldn't see it in the wheel and could only see it via measurements. More than good enough for now.

Pulled the car back down and scaled it - with the changes over the winter and the smaller fuel tank I installed it's down about 25lbs less than I expected it to be... 1174 wet. which will work out to be just about ideal with the finished up front end. I attribute the extra weight loss to pulling to seats and running foam in their place. With my chunky butt in it I'm over minimum weight.

My co driver working on ride height before we corner balanced it
Image

All ready to go out
Image

Co-driver about to go scrub down those fresh Avons
Image

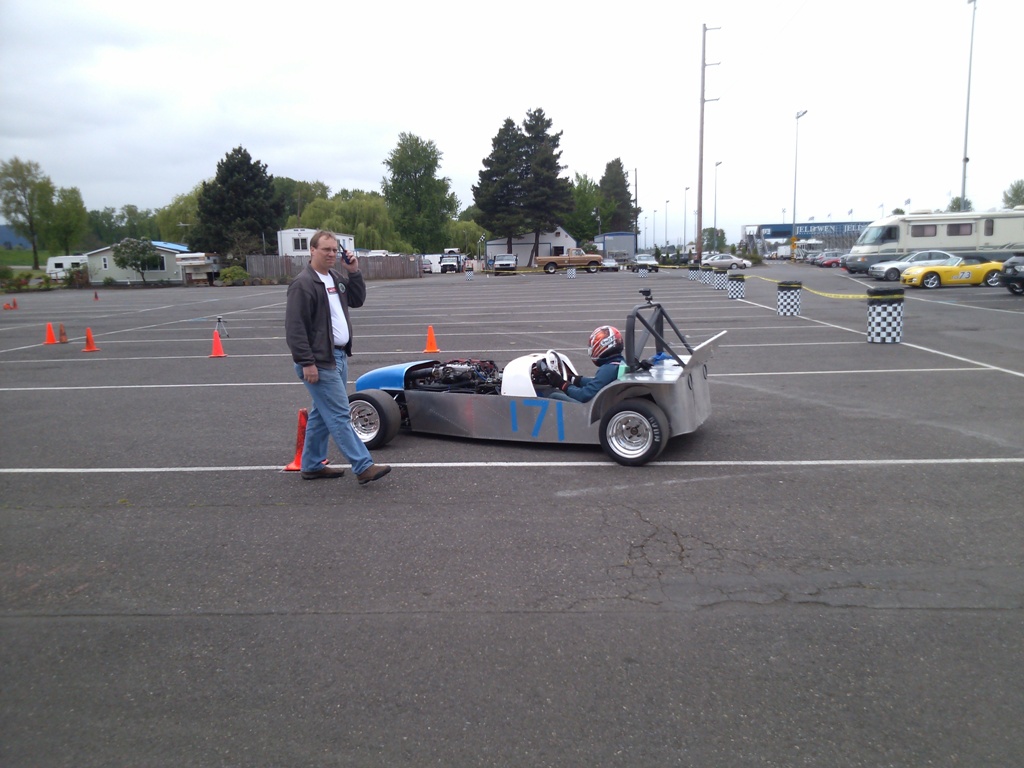
the alignment really helped. When I strung the car and scaled it it was really out of whack - the corner weights were all off and as an example of how bad an eyeball alignment is - the rear total toe was about 1/2" out

with all the changes the car went from really hard to drive & pushy to feeling absolutely fantastic. I went from 4.5 seconds off of the FTD pace last time to a solid 1/2 FTD finish with a good margin and the best PAX finish I've had yet.

Even on the really patchy and chewed up lot we ran at the 2" front and ~3" rear ride height and didn't have any problems.

2 more weeks to the next event that is a two day at packwood. Really excited about running the big course and by then I'll hopefully be done with the front nose & splitter.

I do have a question for folks - with the light gauge aluminum rear fenders I'm amazed at the rock hits showing through after one event. What are people doing to minimize punch through on fenders?

_________________
My Build thread: F20C powered Autox & track toy

Buy my car! - F20C Race car


Top
 Profile  
Reply with quote  
PostPosted: April 23, 2013, 7:43 am 
Offline
User avatar

Joined: December 7, 2012, 8:28 am
Posts: 1410
Location: Sarasota
I think most people use the clear plastic protective tape that most cars have just in front of the rear wheels. Either that or go old school Locost style and use sand paper. I would only do that is you plan to paint it though.

_________________
2015 & 2016 EMod Florida State Autocross Champion
2013 & 2014 DSP Florida State Autocross Champion

Scrap Metal Build Log viewtopic.php?f=35&t=14558


Top
 Profile  
Reply with quote  
PostPosted: April 23, 2013, 10:06 am 
Offline
Toyotaphobe
User avatar

Joined: April 5, 2008, 2:25 am
Posts: 4829
Location: Fort Worth, Texas
Front fenders and a layer of the black no slip applique that is used on boats.

Without something your fenders won't be pretty very long at all. Like maybe one outing.

_________________
mobilito ergo sum
I drive therefore I am

I can explain it to you,
but I can't understand it for you.


Top
 Profile  
Reply with quote  
PostPosted: April 23, 2013, 1:51 pm 
Offline

Joined: September 30, 2011, 4:08 pm
Posts: 245
Location: Portland, OR
carguy123 wrote:
Front fenders and a layer of the black no slip applique that is used on boats.

Without something your fenders won't be pretty very long at all. Like maybe one outing.


that was what surprised me... I had hit a cone on one of the rear fenders and tweaked it - enough to show I need a cone catcher... no big surprise until I get hte sides finished up

but yesterday I was at the shop and I realized how dented up the entire fenders were. All of 6 runs did that... I suppose I'll get some new metal sheets and replace those and use no slip tape next time.

thanks 'gents

_________________
My Build thread: F20C powered Autox & track toy

Buy my car! - F20C Race car


Top
 Profile  
Reply with quote  
Display posts from previous:  Sort by  
Post new topic Reply to topic  [ 224 posts ]  Go to page Previous  1 ... 9, 10, 11, 12, 13, 14, 15  Next

All times are UTC - 5 hours [ DST ]


Who is online

Users browsing this forum: No registered users and 34 guests


You cannot post new topics in this forum
You cannot reply to topics in this forum
You cannot edit your posts in this forum
You cannot delete your posts in this forum
You cannot post attachments in this forum

Jump to:  
POWERED_BY