LocostUSA.com

Learning how to build Lotus Seven replicas...together!
It is currently April 17, 2024, 11:08 pm

All times are UTC - 5 hours [ DST ]


Post new topic Reply to topic  [ 68 posts ]  Go to page Previous  1, 2, 3, 4, 5  Next
Author Message
PostPosted: February 26, 2016, 9:59 am 
Offline

Joined: January 1, 2015, 1:55 pm
Posts: 327
After looking at the body I'm making it's clear that it doesn't look much like a 27 Ford. Don't worry. I'm not going to start a new thread. :D But, I like the sleeker, smoother, and lower look so I'll finish it and see what I end up with.

I've had a couple rolls of different weight mat for a long time. I purchased them from an online supplier called FIBERGLAST. They are expensive but convenient.


Top
 Profile  
Reply with quote  
PostPosted: February 27, 2016, 8:27 pm 
Offline

Joined: January 1, 2015, 1:55 pm
Posts: 327
Today's progress. I only worked a few hours. I didn't even go to the shop yesterday. I'm not feeling great so I'm trying not to over do it. I have a full knee replacement on March 14. I was hoping to finish the build before my surgery but, that's not going to happen.

I made a 2ft long sanding board and attached 36 grit self adhesive sand paper to it. The foam is 2 inches thick. The body tapers from 2inches wide at the top to 1/4 inch at the bottom. I used a guide coat of primer to see highs and lows. It's a simple body.

Tomorrow I hope to do the final sanding and apply a layer of 1.5 oz mat to the foam. Because I'm not running fenders I know that a high quality paint job will get ruined pretty quickly. I'm seriously considering doing the body, inside and out, with black bed liner.

I'm not going to use the Cadillac replica air cleaner. It's too tall for my liking. I think that I'll used a dropped, race car style air cleaner for now.

Image


Top
 Profile  
Reply with quote  
PostPosted: February 28, 2016, 8:17 am 
Offline
Automotive Encyclopedia
User avatar

Joined: December 22, 2006, 2:05 pm
Posts: 8042
I was thinking you might as well make your own with all the flat panels. That is trip hazard low!

_________________
Miata UBJ: ES-2074R('70s maz pickup)
Ford IFS viewtopic.php?f=5&t=13225&p=134742
Simple Spring select viewtopic.php?f=5&t=11815
LxWxHt
360LA 442E: 134.5x46x15
Lotus7:115x39x7.25
Tiger Avon:114x40x13.3-12.6
Champion/Book:114x42x11
Gibbs/Haynes:122x42x14
VoDou:113x44x14
McSorley 442:122x46x14
Collins 241:127x46x12


Top
 Profile  
Reply with quote  
PostPosted: February 28, 2016, 11:03 am 
Offline
User avatar

Joined: September 22, 2005, 8:12 am
Posts: 1880
Location: 4AGE in S.E. Michigan
Looking good :cheers: :cheers:
Dave W


Top
 Profile  
Reply with quote  
PostPosted: February 28, 2016, 1:35 pm 
Offline
User avatar

Joined: July 29, 2006, 9:10 pm
Posts: 3164
Location: Oregon, usually
Miatav8,MstrASE,A&P,F wrote:
That is trip hazard low!
Yep, unless those 3 x 2 steel tube things you're resting the frame on are for construction convenience, you might want curb feelers for speed bumps. And be careful crossing the old fashioned manhole* covers, the kind with the raised lettering. :)

*Are they called personhole covers yet? Sheesh, it's the 21st Century, we need to get with the program!

_________________
Locost builder and adventurer, and founder (but no longer owner) of Kinetic Vehicles


Top
 Profile  
Reply with quote  
PostPosted: February 28, 2016, 4:00 pm 
Offline

Joined: January 1, 2015, 1:55 pm
Posts: 327
Home for the day. I spent a few hours today on the body. I'm not going to get it glassed today. I still have a few small details to work on. I should be able to get those done in the morning. My son is going to help me lay up the glass tomorrow.

- The frame is set at 4 inches for me to work on. There is 1 by 1 tubing welded to the top of the 2 by 3 tubing. But, I have the suspension set for a ride height of 4.5 inches.

- I am going to end up cutting the collectors and changing the angle to match the body. I was hoping to avoid that as I didn't want to ruin the coating. I'm thinking that I after cutting and welding I can wrap just the collectors with black header wrap. I think it would look ok.

- I plan to have a separate dash that will bolt to the frame. On the body you can see a "crown" that follows the top of the cowl radius. I will trim away the excess glass and leave the 1 inch lip. This will cover the top edge of the dash. The foam actually ends 1 inch above the top frame rails. The dash will extend down 1 inch more than what is shown in the pictures.

- The windshield frame will bolt to the upper frame rails.

Image

Image

Image

Image


Top
 Profile  
Reply with quote  
PostPosted: February 28, 2016, 4:52 pm 
Offline
User avatar

Joined: July 29, 2006, 9:10 pm
Posts: 3164
Location: Oregon, usually
stinger wrote:
- The windshield frame will bolt to the upper frame rails.
Sounds smart. Through holes in the body, or behind?

_________________
Locost builder and adventurer, and founder (but no longer owner) of Kinetic Vehicles


Top
 Profile  
Reply with quote  
PostPosted: February 28, 2016, 5:44 pm 
Offline

Joined: January 1, 2015, 1:55 pm
Posts: 327
I'm going to make a bracket that will bolt to the top frame in front of the dash and place the bottom of the glass in the proper location on top of the scuttle. I don't want to have any holes through the body. At least that's the idea.

I'm going to have provisions for a bolt on trailer hitch. I want to build a rack for golf clubs and old looking touring trunk that I will attach using the trailer hitch. And, I want to be able to pull a small camper trailer. Maybe a motorcycle style pop up or one of the old tear drop looking ones. I want to drive this cross country. :)


Top
 Profile  
Reply with quote  
PostPosted: February 28, 2016, 6:16 pm 
Offline

Joined: March 28, 2012, 5:29 pm
Posts: 316
Location: East Lansing, MI
John,
Great work. The afternoon on the couch is well deserved.
If you aren't confined to using a replica body it's great that you make it just as you want it.
When I built the plug for our modifieds, I used a glass Model A cowl. The sides were 36 Roadster doors skins, as we sold those, and a 36 Cabriolet trunk skin for the back panel, as we sold those too. Blocks of foam and lots and lots of bondo got the shape I wanted, and looked like something Ford might have made. Google Real Hot Rods for some pictures.
Hope all goes well with your surgery, just don't push too hard, too soon. That is the voice of a stubborn pig headed impatient patient speaking. Do as I say, not what I do :D .
Cheers,
Stewart.


Top
 Profile  
Reply with quote  
PostPosted: February 29, 2016, 1:42 am 
Offline
User avatar

Joined: August 27, 2005, 1:04 am
Posts: 1414
Location: Kamloops, BC, Canada
It's coming along nicely, looks good. On cutting and welding the collector to match the body lines, how about trimming the primaries at the heads so the exhaust matches the taper of the body? The weld wouldn't be as noticeable, and the whole header would match the body taper instead of just the collectors. But the primaries would sweep forward a bit, so it might look weird. I guess that's where building headers from scratch would be handy.
Kristian

_________________
V6 in a book frame build. Now registered.
viewtopic.php?f=35&t=7587
viewtopic.php?f=33&t=18172


Top
 Profile  
Reply with quote  
PostPosted: February 29, 2016, 5:58 pm 
Offline
Automotive Encyclopedia
User avatar

Joined: December 22, 2006, 2:05 pm
Posts: 8042
I would like to build one of these, just like it is. The body is available for about $750 in glass from the firewall back and made for t buckets. The rest could be fabbed or bought for other applications.

I doubt I ever will, considering how thin I am spread but maybe it can give others enough interest.


You do not have the required permissions to view the files attached to this post.

_________________
Miata UBJ: ES-2074R('70s maz pickup)
Ford IFS viewtopic.php?f=5&t=13225&p=134742
Simple Spring select viewtopic.php?f=5&t=11815
LxWxHt
360LA 442E: 134.5x46x15
Lotus7:115x39x7.25
Tiger Avon:114x40x13.3-12.6
Champion/Book:114x42x11
Gibbs/Haynes:122x42x14
VoDou:113x44x14
McSorley 442:122x46x14
Collins 241:127x46x12


Top
 Profile  
Reply with quote  
PostPosted: March 1, 2016, 3:11 pm 
Offline
User avatar

Joined: July 29, 2006, 9:10 pm
Posts: 3164
Location: Oregon, usually
Car Wars Episode 1: The Bantam Menace

Just throwin' that out there. And now, back on subject:

Gosh, stinger hasn't posted for almost two days. At the rate he's been going, his body is probably in the paint booth by now.

_________________
Locost builder and adventurer, and founder (but no longer owner) of Kinetic Vehicles


Top
 Profile  
Reply with quote  
PostPosted: March 1, 2016, 5:06 pm 
Offline

Joined: December 16, 2015, 5:31 pm
Posts: 86
He hasn't posted because he's busy driving it.


Top
 Profile  
Reply with quote  
PostPosted: March 1, 2016, 6:19 pm 
Offline

Joined: January 1, 2015, 1:55 pm
Posts: 327
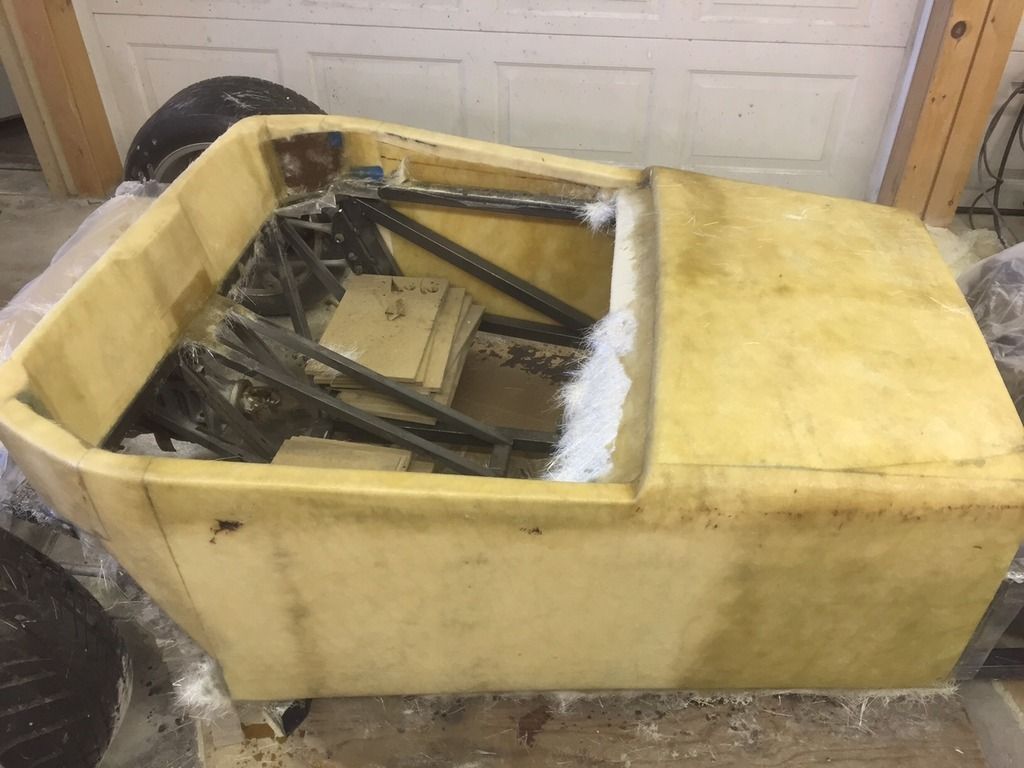
I wish that I was done and driving it! I still wasn't feeling well on Sunday so I stayed home on the couch. I did make it to the shop yesterday and glassed the exterior of the body. I still have to work on the inside radius from the sides to the rear of the body. I'm going to let the body cure for a couple of days then trim the glass, remove the body, turn it over and finish glassing the edges and inside surfaces.

My son wants to build one of these so I purchased more steel today to build another frame. I was going to finish the body and use it as mine. Now that my son wants one I guess that I'll pull a mold from it. With Knee Replacement on the 14th work will be coming to an end soon. It won't get done until summer.

This will not come as a surprise. I'm changing a couple of things for this build. I'm pretty sure that I'm going to ditch the headers and go with a Lakester header. I'll probably purchase a precut kit and then weld it up so that I make sure they clear the body and match the angle of the body/frame.

I'm going to go with a 4l60E transmission. I'll use a paddle shifter that is attached to the steering wheel. The wheel is on a quick release hub so that I'll be able to remove the wheel with shifter when the car is unattended.

Joe. let me know your shipping info and I'll forward the MG pedal assembly. I'll cover the shipping cost.

Here is a picture of the glassed body. The difference in color is due to using polyester resin from 2 different suppliers. When the glass work is done then the sanding and filler skim coat and more sanding comes.

Image


Top
 Profile  
Reply with quote  
PostPosted: March 3, 2016, 6:55 pm 
Offline

Joined: January 1, 2015, 1:55 pm
Posts: 327
I pulled the body off, trimmed it, turned it over and glassed the rest of it. Then I trimmed it again and sprayed it with sandable primer. Then slipped it back on the frame to check it out. For the body, the next step, is sanding, skim coat of filler, sand some more, seal it, spray it with a few layers of 2 part primer, and finally buff it out. Then I'll pull a mold.

I have a transmission coming so that I can install it and then finish the trans tunnel.

Tomorrow I hope to get the windshield frame/supports figured out and done.

My goal is to have the frame complete with all tabs, ect by early next week. The body will not get done until after my knee replacement. Unfortunately I'm just about done until I've recovered from surgery.

Image


Top
 Profile  
Reply with quote  
Display posts from previous:  Sort by  
Post new topic Reply to topic  [ 68 posts ]  Go to page Previous  1, 2, 3, 4, 5  Next

All times are UTC - 5 hours [ DST ]


Who is online

Users browsing this forum: No registered users and 8 guests


You cannot post new topics in this forum
You cannot reply to topics in this forum
You cannot edit your posts in this forum
You cannot delete your posts in this forum
You cannot post attachments in this forum

Jump to:  
POWERED_BY