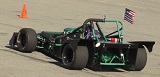
So, geologic time has passed, but on the good side, the jolly old elf has visited. Enclosed you will find a beautiful picture of a Boyd welding 15 gallon tank, approximately (but not exactly) where it will fit in the front end. OK, the picture stinks, but the tank is beautiful.
Also can be seen, a photo of the newly triangulated underpinnings that will support said tank, along with the clutch pedal and some other doohickies. The old elf brought a brake pedal and associated master cylinders as well, not shown. The clutch is an all important stand in for all of that stuff..
It should be noted that I have been a bit busy with the welder. A tunnel suitable for big gulps appeared (I suggested to Dismantalus that this was my stand in for when my favorite gearhead cousin was not available to "hold my beer and watch this." Dismantalus suggested a beer holder was inappropriate in a car, and I have to agree with that, but it does ruin the joke, so it is now a big gulp holder and place to put the shifter.)
Finally, a shot of my front, passenger side rear suspension mount. 1.25" 14 ga. steel tube supported on each side by .125" steel sheet drilled to 1/2" to hold a spherical joint. Yea verily, we have measured, cut, welded, drilled, cut and welded, that is to say, we have committed fabrication.
Progress is progress. From all of this, you can surmise that I have decided on brake equipment, defined the front suspension (rear too, but I'm not letting on until pictures are ready) mounting points, and have begun the stunningly slow process of fabbing br@#&ets. You will note the proper spelling used here. I have joined the ranks of JD, having thought a one-hour job would take, you know, and hour, and found that it took a whole afternoon, plus a trip to the HD of your choice for new hardware. These funny looking items are because I forgot to design the suspension first,

so they have to be a bit longer than is truly necessary (or appropriate in mixed company). Given that, I did not want them to be a HUGE torque arm, so had to angle them towards the spindle to reduce off-axis loading, so that meant I didn't have to measure where the bolt would go, but where the bearing would go, on axis in the right plane with zeros firing at it... wait, wrong movie. What you end up with is 7 cuts, 4 holes drilled, and at least 10 welds each, given the duty cycle of the home electrical service, and a whole lot of grinding and fitting, measuring and, you get the idea. The second one took 2 hours, which is waaaaay better. I should be done by the time my baby daughter is out of college. Maybe.
_________________
Figuring out how to build in the bucolic garden state
Build log:
viewtopic.php?f=18&t=18224


 . So deep I don't even want to show them for fear that the next ones will somehow magically take twice as long. Sure, your head can explode like JDs (actually, I think that would be impossible for most of us. My head is not thermonuclear, more like C4), but that won't get the br@cket made, the seat connected to the frame, the pedals attached to something that can, in turn, attach to the frame. It is, in short, an arduous and long process.