LocostUSA.com

Learning how to build Lotus Seven replicas...together!
It is currently May 14, 2024, 5:25 pm

All times are UTC - 5 hours [ DST ]


Post new topic Reply to topic  [ 207 posts ]  Go to page Previous  1 ... 7, 8, 9, 10, 11, 12, 13, 14  Next
Author Message
 Post subject: Re: Stalker BMW build
PostPosted: May 28, 2020, 12:30 am 
Offline
User avatar

Joined: March 19, 2011, 10:22 am
Posts: 2398
Location: Holden, Alberta, Canada
Very nice Alex.
For me to achieve those kind of results took having a second child in 1982 and investing in food, shelter, education, and organized sports for him. He then became an automotive painter, now if I'm lucky he has time to fit in fenders and nose cones to paint for me.
I guess the end result is the same, a painted Super 7, but your way of doing it looks a lot less stressful and time consuming:lol:
But then again I have no regrets the way I did it. :cheers:

_________________
Perry

'If man built it, man can fix it'
"No one ever told me I couldn't do it."
"If you can't build it safe, don't build it."

Perry's Locost Super Che7enette Build
Perry's TBird Based 5.0L Super 7 L.S.O
Perry's S10 Super 7 The 3rd
Perry's 4th Build The Topolino 500 (Little Mouse) Altered
Perry's 5th Build the Super Slant 6 Super 7
Perry's Final Build the 1929 Mercedes Gazelle


Top
 Profile  
Reply with quote  
 Post subject: Re: Stalker BMW build
PostPosted: May 28, 2020, 1:32 am 
Offline
User avatar

Joined: December 24, 2007, 5:11 am
Posts: 1307
Location: Seattle area
I try not to be an envious person but Dang! I do feel some pangs of jealousy when I see how talented some painters are. I have tried and tried. Only decent finish I was to achieve was to vinyl wrap it.

_________________
Larry in Seattle


Top
 Profile  
Reply with quote  
 Post subject: Re: Stalker BMW build
PostPosted: May 28, 2020, 9:58 am 
Offline
User avatar

Joined: July 17, 2008, 9:11 am
Posts: 6419
Location: West Chicago,IL
Fabulous. Simply fabulous! :cheers:

_________________
Chuck.

“Any suspension will work if you don’t let it.” - Colin Chapman

Visit my ongoing MGB Rustoration log: over HERE

Or my Wankel powered Locost log : over HERE

And don't forget my Cushman Truckster resto Locostusa.com/forums/viewtopic.php?f=36&t=17766


Top
 Profile  
Reply with quote  
 Post subject: Re: Stalker BMW build
PostPosted: May 28, 2020, 12:17 pm 
Offline

Joined: December 18, 2010, 3:29 pm
Posts: 169
horchoha wrote:
Very nice Alex.
For me to achieve those kind of results took having a second child in 1982 and investing in food, shelter, education, and organized sports for him. He then became an automotive painter, now if I'm lucky he has time to fit in fenders and nose cones to paint for me.
I guess the end result is the same, a painted Super 7, but your way of doing it looks a lot less stressful and time consuming:lol:
But then again I have no regrets the way I did it. :cheers:


That's hilarious :lol: Kicking off the project is way more fun your way, though!

Alex


Top
 Profile  
Reply with quote  
 Post subject: Re: Stalker BMW build
PostPosted: May 28, 2020, 11:46 pm 
Offline
User avatar

Joined: March 19, 2011, 10:22 am
Posts: 2398
Location: Holden, Alberta, Canada
ajmacdon wrote:
That's hilarious Kicking off the project is way more fun your way, though!

Yeah come to think of it that is hilarious, who would have thought that back in 1982 me and wifey 'friendly wrestling' would have resulted in a Super 7 being painted in 2020 :!: :rofl: :yay:

_________________
Perry

'If man built it, man can fix it'
"No one ever told me I couldn't do it."
"If you can't build it safe, don't build it."

Perry's Locost Super Che7enette Build
Perry's TBird Based 5.0L Super 7 L.S.O
Perry's S10 Super 7 The 3rd
Perry's 4th Build The Topolino 500 (Little Mouse) Altered
Perry's 5th Build the Super Slant 6 Super 7
Perry's Final Build the 1929 Mercedes Gazelle


Top
 Profile  
Reply with quote  
 Post subject: Re: Stalker BMW build
PostPosted: June 2, 2020, 10:23 am 
Offline

Joined: December 18, 2010, 3:29 pm
Posts: 169
Short but fun update on a big milestone. The first permanently attached aluminum panels are going in! Happy with the look so far. most of the top of the tunnel will get covered also so the red will turn into even more of a highlight. I am glad I did the bellhousing area with panels on the inside to show off a bit more of the red frame, though, that's the look I was going for. Floors are next and will get some structural adhesive as well, these are just riveted.

Image

Alex


Top
 Profile  
Reply with quote  
 Post subject: Re: Stalker BMW build
PostPosted: June 8, 2020, 7:29 pm 
Offline

Joined: December 18, 2010, 3:29 pm
Posts: 169
Floors have been the latest project and turned out great. One of the rare projects that in real life went exactly as I imagined in my head.

I think I mentioned before that I got spooked about road debris so they're 0.1" 7075, stout. No sense in that material if it's not well attached so they are held on with 3M structural adhesive and cherry structural rivets. I painted the bottom of the floors with the same rocker texture I'm using elsewhere, trying to limit the number of finishes just so it doesn't get too busy. Prety much 3-4 basic colors/textures. I left the tops bare aluminum since it was really well protected with a thick film so looks pretty great when you peel it off. I think I'll put sheets of grip tape that are short of the tubes by an inch and a half or so, should look good and keep the scratches in the bare aluminum to a minimum for a while. Lisa wants bound all weather carpet floormats that fit in the tubes but I figure those can happen when the bare floor starts to look bad.

Bought a sweet auto countersink that makes the structural rivets look pretty pro. They are so flush (hella flush!) you can just barely feel them and only based on the texture change. Overall super happy. Bring on the rebar/step ladder/lumber. (don't actually)

BTW, I read after this that Caterham (and Lotus, etc) just uses 0.050" aluminum floors with rivets but no adhesive and bolts the seats right to the aluminum. Yikes. Probably somewhere in the middle is a good, correct engineering answer but I'll err on my side. I also wonder if that would allow enough seat movement to be disturbing. Driver's can really feel seat stiffness, seems like not the best area to skimp on a 'driver's car.'

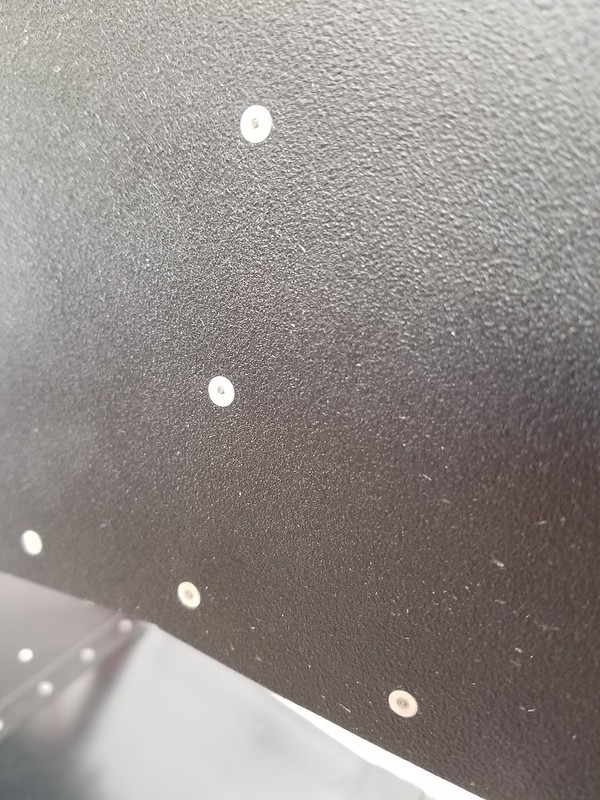
Painted and countersunk:

Image

The rivets really didn't want to photograph with the phone. They look proud here but they're dead flush.

Image

Interior, ignore the yellow tape and blue film, just in case the epoxy spooged.

Image

Done/not done again:

Image

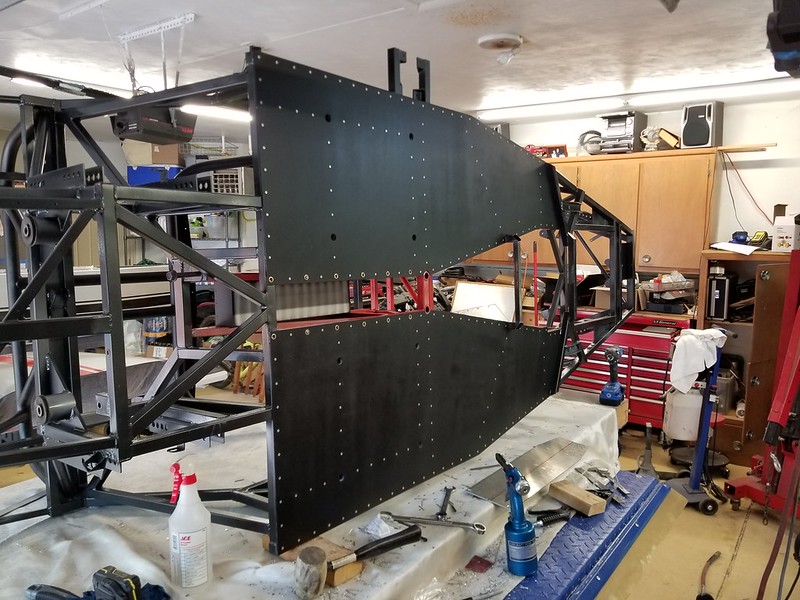
Yesterday's project, center closeout for a bit more structure. This looks a lot like the same part on a C7 which is kind of cool.

Image

Tonight's project, front angles to tie in the motor mounts and seal off the whole thing. NOW they're done (nope, needs powdercoat and final rivets tomorrow, THEN done)

Image

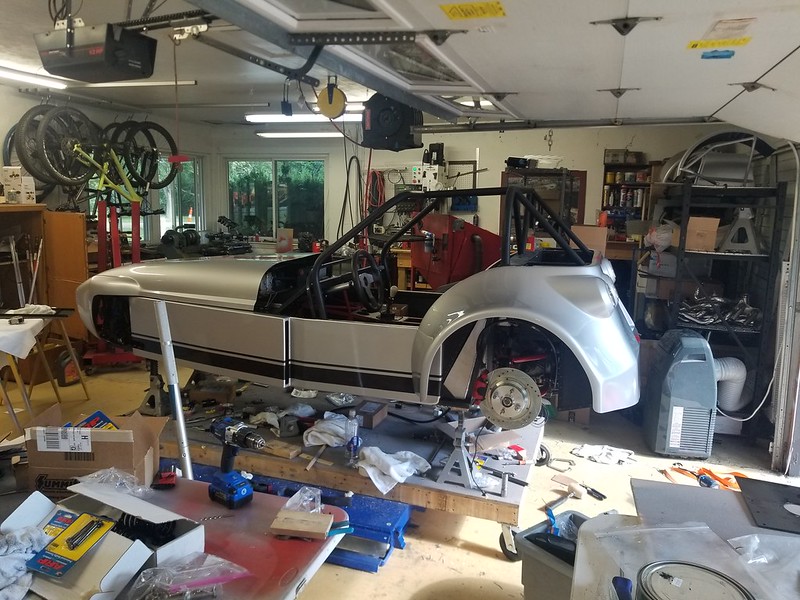
Bottom side of the car had a lot left to do since it wasn't accessible for most of the time. As soon as I drive the 12 rivets in the angle bits it will get flipped over for hopefully the final time (on purpose, anyway)

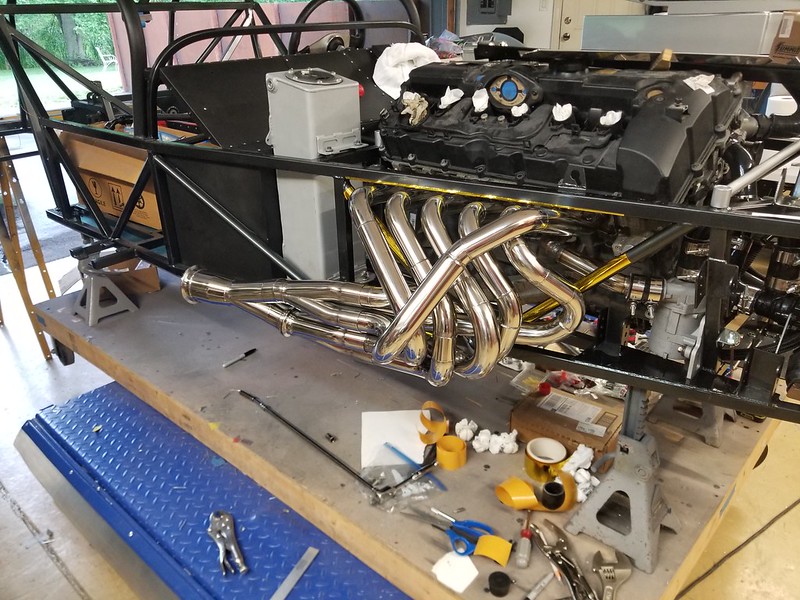
Next is brake and fuel hard lines, way easier without many panels in place. Then carbon sides, then probably engine? I need to think the order through some more.

Alex


Top
 Profile  
Reply with quote  
 Post subject: Re: Stalker BMW build
PostPosted: July 14, 2020, 8:58 pm 
Offline

Joined: December 18, 2010, 3:29 pm
Posts: 169
General assembly is ongoing. Random pics today since I've just been bolting it together in the order that makes access to everything easiest.

ABS, brake lines, and motor mounts:
Image

Steering, clutch master, and paint on the engine bay bracing:
Image

Engine in for the last time? Ugly plastic valve cover is just for install, powder coated mag one on the shelf.
Image

Image

Cooling system and oil tank. Still have upper rad hose to install and oil tank return line.
Image

Plumbed oil pump:
Image

Dry sump pan:
Image

Ubiquitous kit car mini driveshaft (see the sharpie for scale). If you live near metro Detroit this company was awesome. Called Shaftmasters :lol: $90 with me providing the u-joints.
Image

So, just some pics, the list is long enough for three of me to stay busy every day so no thinking, just bolting.

Alex


Top
 Profile  
Reply with quote  
 Post subject: Re: Stalker BMW build
PostPosted: July 15, 2020, 1:15 am 
Offline
User avatar

Joined: March 19, 2011, 10:22 am
Posts: 2398
Location: Holden, Alberta, Canada
Hey Alex
Thats a great price for building the drive shaft. Very nice build. :cheers:
What I am most envious of is how bright your shop is, mine is so coated with years of welding smoke it's like I'm working in a cave. Not to mention my old eyes aren't like they used to be.......

_________________
Perry

'If man built it, man can fix it'
"No one ever told me I couldn't do it."
"If you can't build it safe, don't build it."

Perry's Locost Super Che7enette Build
Perry's TBird Based 5.0L Super 7 L.S.O
Perry's S10 Super 7 The 3rd
Perry's 4th Build The Topolino 500 (Little Mouse) Altered
Perry's 5th Build the Super Slant 6 Super 7
Perry's Final Build the 1929 Mercedes Gazelle


Top
 Profile  
Reply with quote  
 Post subject: Re: Stalker BMW build
PostPosted: July 15, 2020, 10:06 am 
Offline

Joined: December 18, 2010, 3:29 pm
Posts: 169
horchoha wrote:
Hey Alex
Thats a great price for building the drive shaft. Very nice build. :cheers:
What I am most envious of is how bright your shop is, mine is so coated with years of welding smoke it's like I'm working in a cave. Not to mention my old eyes aren't like they used to be.......


Best thing I ever did was buy 5 gallons of plain white paint and a sprayer before I moved in, just literally hosed everything down except the floor.

The lights are just 3 strips of the Home Depot high intensity fluorescents (the thin bulbs, maybe 5/8" diameter). I think there are some good, cheap LED options now but these have been awesome. 7 years old and just as bright as ever with good cold start capability too.

Alex


Top
 Profile  
Reply with quote  
 Post subject: Re: Stalker BMW build
PostPosted: August 6, 2020, 6:21 am 
Offline

Joined: December 18, 2010, 3:29 pm
Posts: 169
More random assembly. Post is prompted by being super happy with how the rear bulkhead turned out. Two parts wouldn't fit in my oven so got a different texture paint. In the end it wound up looking like a sued/leather combo which is cool for that part of the interior, almost looks upholstered.

Image

Gas tank came first. It went in really nice with the rubber strips glued in. I had used wood during mockup but it's super solid feeling lined with rubber now. I pumped it up to 10psi and went over it with soapy water about 10 times. Really didn't want to line it if possible. We'll see, it's super hard to remove so I'm hoping I got it sealed up!

Image

Image

It's crammed in there!

Image

Rubber isolation all around it.

Image

Also pretty geeked about how this is turning out:

Image

Image

Whittling away on some heat shield options for where the header is close. I think with some finishing this will end up being pretty cool. I probably went too thin on the stainless but I didn't want to be gnawing away at thick sheet around those curves. With the right number of rivets it should work and look good.

Image

Fan shroud was another odd but satisfying project.

Image

One more that I was pretty stoked about:

Image

So, pass side body panel is riveted in place now. Putting on the driver's side makes pedal box access super difficult so I'm spending some time making sure that's all set up first. Clutch is bled and adjusted so just need to tie down the clutch sensor wiring and then I should be good to rivet it up. That then lets me get the hood on and finish up the engine compartment. One step at a time. I'm pretty full of elephant right now but still taking a couple bites a day :lol:


Top
 Profile  
Reply with quote  
 Post subject: Re: Stalker BMW build
PostPosted: August 11, 2020, 6:36 am 
Offline

Joined: December 18, 2010, 3:29 pm
Posts: 169
Big parts going on feels like more progress than small parts. Got both sides on, the hood, and rear body. The major work was installing the rear suspension, park brake and trunk paneling underneath the rear body.

The garage is a train wreck again, now that the body is off the stands I think it needs another good cleaning so Lisa can park in there again.

Image

Image

Not sure I'm crazy about the clear taillights. Given they're just simple truck lights I didn't want them to look like simple truck lights. On a darker color maybe it would work better? They're easy to change so I'll get it finished up first but regular red and amber are likely where I'm going eventually.

Image

Fan shroud and baffling is done, looks nice from the front, not doing a grill until something inspires me.

Image

Couldn't handle the hardware store fasteners that came with the kit. They were all randomly all 0.5" to an inch too long as well, ugly. ARP was a splurge but I'm really happy with the look. More important on the front where it's all exposed. Given that the fasteners were already all WAY over-sized it's now double over-strength!

Image

Shifter looks cool with the trim panel installed.

Image

After the garage cleaning there are a bunch of details like electrical component mounting, header and exhaust install, dash and seats, etc. Seeing the end from here, though!

Alex


Top
 Profile  
Reply with quote  
 Post subject: Re: Stalker BMW build
PostPosted: August 11, 2020, 6:53 am 
Offline
User avatar

Joined: June 20, 2019, 12:34 pm
Posts: 592
Beautiful work! The header is a work of art! glad they will be visible.

Thom

_________________
Thom


Top
 Profile  
Reply with quote  
 Post subject: Re: Stalker BMW build
PostPosted: August 11, 2020, 9:54 am 
Offline

Joined: December 18, 2010, 3:29 pm
Posts: 169
BostonWill wrote:
Beautiful work! The header is a work of art! glad they will be visible.

Thom


Thanks! The exhaust is the most fun part of any car build for me by far. I like the art/science combo of the whole thing.

Alex


Top
 Profile  
Reply with quote  
 Post subject: Re: Stalker BMW build
PostPosted: August 12, 2020, 9:33 pm 
Offline

Joined: May 30, 2020, 3:35 pm
Posts: 2
Love the rear fenders. Try some colored filter jells from a photo shop to shade the rear lights or candy model paint.


Top
 Profile  
Reply with quote  
Display posts from previous:  Sort by  
Post new topic Reply to topic  [ 207 posts ]  Go to page Previous  1 ... 7, 8, 9, 10, 11, 12, 13, 14  Next

All times are UTC - 5 hours [ DST ]


Who is online

Users browsing this forum: No registered users and 9 guests


You cannot post new topics in this forum
You cannot reply to topics in this forum
You cannot edit your posts in this forum
You cannot delete your posts in this forum
You cannot post attachments in this forum

Jump to:  
POWERED_BY